Children's Book Author
Art Activities
Quick and simple art activities are great to have on hand when you are spending more time at home but sometimes a longer, more challenging project is welcome, particularly for older kids. Here is a handful of activity ideas that allow young artists to spend 1-2 hours delving deeply into a project. A DIY art gallery is a fun way to share completed projects with family and friends.


Sunset Mosaic Collage
A detailed collage is a great not-so-simple art project to keep kids engaged and challenged for several hours.
For this project you will need:
-Paper
-Pencil
-Scissors
-Glue
-Stack of old magazines
Start by selecting an image to inspire your collage. Simple drawings with strong lines and clear color definition work best. We chose a picture of a sunset over a mountain lake.
Tape your inspiration image next to a piece of blank paper and have your artists sketch their own version. Draw divisions between different sections of color. For example, our inspiration image included a colorful sky at sunset so we drew lines in the sky where one color ended and the next began. When you are finished with your sketch, label each section by color.
Have your artists sort through a stack of old magazines and cut out small pieces (no bigger than ½”) in the different colors labeled on their drawing. Food magazines work really well for this. Corn kernels are great for yellow, tomatoes are perfect for red, and so forth. Make individual piles of each color until everyone has an ample supply.
Now it’s time to start gluing. Pour some liquid glue in a small paper bowl or cup and apply it with a paintbrush. A glue stick will work as well. It is easier to apply the glue to the paper rather than the individual cut up pieces. Fill each section of your drawing with magazine pieces in the correct color, overlapping as needed so that none of the white paper is visible.
This collage project can be as advanced or simple as needed. Challenge older kids to work with a more detailed inspiration image or original artwork, and smaller magazine pieces. For younger kids, cut larger pieces and use a simpler design.


Watercolor Toucan
A colorful activity that combines sketching, tracing and painting all in one.
For this project you will need:
-Watercolor paper
-Masking or washi tape
-Pencil
-Black sharpie
-Watercolor paints and cup of water
-Paintbrushes
-Dry sponge
-Hairdryer (optional)
This project comes courtesy of my son’s incredible art teacher at For Art’s Sake. We used Ms. Debbe’s toucan drawing as a template (included below with her generous permission), but you can also use any simple drawing of a bird and flowers, or create your own. This works best if an adult acts as the teacher and draws and paints the bird on a separate piece of paper while young artists follow along.
For set up, artists should use masking or washi tape to make a ½” border around their watercolor paper. This creates a nice, crisp white outline when you remove the tape once the paint is dry. Print out your bird template and layer your own piece of paper on top. As the “teacher” you will be tracing the template step by step while your artists follow along and draw a freehand version on their own papers. You should draw with a sharpie to make your lines easier to see. The kids should use a pencil.
Start by drawing the bird’s eyes, then move to the beak, body, wing and feet. Next draw the branch, and finish with the flowers and leaves. Once your artists have finished their own drawings, they should trace over their pencil lines with a black sharpie marker.
For the watercolor, demonstrate on your paper while your artists follow suit. Start by painting the entire background a shade of blue of your choosing. Use the sponge to soak up or “erase” unwanted paint. Wait a few minutes for the background paint to dry, or speed up the process with a hairdryer. Next move on to the birds’ beak, body and feet. If you can, try to leave a white dot or “hotspot” in the center of the bird’s eye. Paint the branch brown, with darker paint at the bottom of the branch to create depth. Finally paint the flowers and leaves, mixing greens and yellows for the leaves and any bright colors you want for the flowers.
When the paint is dry, carefully remove the masking or washi tape from the edges of your beautiful painting.


Day and Night Oil Pastel
A frame-worthy project using oil pastel. Young artists will enjoy the fun blending technique and drawing the tangle of branches.
For this project you will need:
-Set of oil pastels
-Drawing or sketch paper
-Masking or washi tape
-Paper towel
-Dark graphic pencil (10B or 9B)
-White glass marking pencil
-White correction pen or paint pen
-Ruler (optional)
This project is from the terrific YouTube channel Art Arena by Deepak. Watch this video for step-by-step instructions.
Here are a few small adjustments to make things more kid friendly:
Before starting with the oil pastels, use a ruler to determine the center of the paper and draw a vertical line with a pencil. (In the video, the artist freehands the center line with an oil pastel). Then place masking tape to the right side of the pencil line to act as a barrier and help ensure you don’t color over the center line.
When you finish the “day” side, move masking tape to the left side of the center pencil line.
Use a ruler to draw the rope lines for the swings.
Tip for left handers - the video instructs you to begin with the “day” side. If you have left-handed artists, you may want to start with the “night” side instead to prevent smudging.


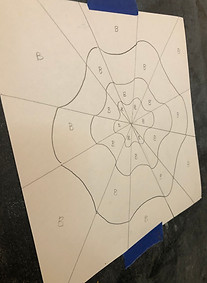
Optical Illusion Art
Combine an art history lesson on the Op Art movement of the 1960s with these impressive black and white drawings.
For this project you will need:
-Square piece of white paper (roughly 10x10”, a bit smaller is fine too)
-Ruler
-Pencil
-Black Sharpie (fine point)
-Black and White colored pencils
This project is from another wonderful website called
We followed Mrs. Filmore’s straightforward directions and were amazed with the final products. Shading with the colored pencils really did make a huge difference (see our photo below with one shaded drawing, and one yet to be shaded) and the drawing seemed to pop off the page like magic.
This is a great project for older kids. Younger kids may need assistance drawing the lines – my 6-year-old needed help making sure the lines crossed exactly at the same point in the center of the page, for example, but was able to fill in the squares and do the shading on his own. Tip – have extra sharpies on hand in case yours starts to run out.


Sunflower Triptych
A great activity that utilizes many of the techniques and mediums used in the other projects.
For this project you will need:
-Paper
-Masking or washi tape
-Pencil
-Scissors
-Glue
-Stack of old magazines
-Oil pastels
-Paper towel
-Watercolor paints and cup of water
-Paintbrushes
A triptych is a piece of art divided into three separate sections or panels. Sometimes the three sections combine to make a complete picture, and sometimes the three sections are different pictures, linked by color or theme.
For these triptychs, each of the three sections will be the same picture but created with a different artistic medium. One section will be collage, one section watercolor, and one section oil pastel. The idea is for your artists to use the different techniques they used in previous activities all together in one final project.
To start, tape a border of masking or washi tape around your paper, in landscape orientation. Then divide the paper into three equal sections using two additional pieces of tape.
Print out a photo of a sunflower (or other flower of your choosing), and tape it next to your paper. Have your artists sketch their own version of the flower with a pencil in each of the three sections of their triptych. The flower sketch should be as consistent as possible.
Then, just as in the Sunset Mosaic Collages outlined earlier, have your artists sort through a stack of old magazines and cut out small pieces (no bigger than ½”) in the different colors of the sunflower. Fill the sunflower in one of the three triptych sections with magazine pieces in the correct color, overlapping as needed so that none of the white paper is visible. We recommend using collage for the middle of the three sunflowers, but use whichever order you like.
Next, move on to watercolor, and oil pastel. Keep the background color – we chose blue – consistent for all three sections. For the background of the oil pastel section, use different shades of blue and blend together using the same technique from the Day and Night Oil Pastels.
When your artists have finished all three sections and the watercolor is dry, carefully peel off the masking or washi tape to make a crisp white border between triptych sections.


DIY Art Gallery
Celebrate all the great art you've created by transforming your living room into an art gallery. Have your artists come up with names for each of their creations and label them as if they were in a museum. Hang the art around the room. Make a tray of snacks and serve special drinks. Invite family and friends to your gallery or have your artists give them a virtual tour over FaceTime or Zoom.

Make a Connection
If you are looking for different ways to connect online, these art projects translate really well over zoom. My 10-year-old nephew across the country joined us for each activity and it was a big success. We sent a supply list ahead of time and the cousins loved completing the projects together.

